Apply Sorting Using AngularJS

Introduction

In this article I will tell you how to do sorting using AngularJS.

Angular provides the feature named orderBy that can be used to sort the given data. Here I will create an application where sorting will be applied on multiple columns.

Step 1

First of all you need to add an external Angular.js file to your application, in other words “angular.min.js”.

After downloading the external file now you need to add this file to the Head section of your application.

To learn more about features of AngularJS, you can enroll for a live demo on Angularjs Online Training

<head runat="server">

    <title></title>

    <script src="angular.min.js"></script>

</head>

Step 2

Now after adding the external JS file the first thing you need to do is to add ng-app in the <HTML> Tag otherwise your application will not run.

<html ng-app xmlns="http://www.w3.org/1999/xhtml">

Now I will create a simple application that will help you understand this filter.

Take your career to new heights of success with Angular Training

First I will create a JavaScript function in which some initial values will be passed.

<script>

        function x($scope) {

            $scope.cars =

                [{ name: 'Alto 800', price: '3.5 Lakh', version: 'Manual' },

                 { name: 'Eon', price: '4.2 Lakh', version: 'Manual' },

                 { name: 'i20', price: '7 Lakh', version: 'Automattic' },

                 { name: 'Honda City', price: '11 Lakh', version: 'Automattic' },

                 { name: 'i10', price: '5 Lakh', version: 'Manual' }]

            $scope.sorting = '-version';

        }

    </script>

Here I have created an Array of some data, three columns are created in which multiple names, prices and versions of car are defined.

Then reverse sorting is applied on the version of car, this is the initial sorting, later in this article I will show you how to apply sorting on all the columns.

Step 3

Our work on the View is completed and now I will work on the View Model of this application.

<body>

 <div ng-app>

  <div ng-controller="x">

    [ <a href="" ng-click="sorting=''">Default</a> ]

    <table class="car">

      <tr>

        <th><a href="" ng-click="sorting = 'name'; reverse=!reverse">Name</a>

        <th><a href="" ng-click="sorting = 'price'; reverse=!reverse">Price</a></th>

        <th><a href="" ng-click="sorting = 'version'; reverse=!reverse">Version</a></th>

      </tr>

      <tr ng-repeat="car in cars | orderBy:sorting:reverse">

        <td>{{car.name}}</td>

        <td>{{car.price}}</td>

        <td>{{car.version}}</td>

      </tr>

    </table>

  </div>

</div>

</body>

“x”, which was the name of the function in Step 2, is bound with one of the parent Divs using ng-controller. Then a table is created in which three headings are provided in separate columns, in these headings anchors are used whose click is bound to the name or price or version, these clicks will work for sorting the data.

Then one more table is created in which the ng-repeat directive is used and its columns are bound to the name, price and version of car. As the repeat directive is used it will cerate a dynamic table of the data. In this table orderBy is used that shows that it’s column will be sorted whenever “sorting” is called.’

Get More Info Here Angular Certification

Now our application is created and is ready to for execution.
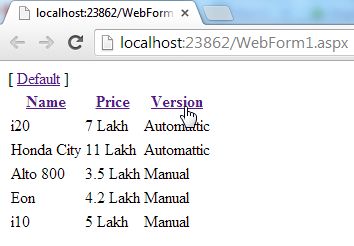
Output

On running the application you will get an output like this one:

sorting using AngularJS

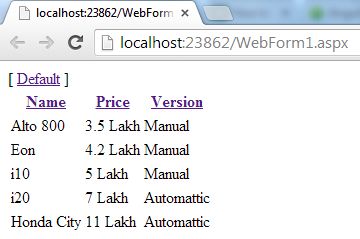
You can see that all the data is displayed in table format and in the heading section an anchor is provided whose click should provide the sorting on a specified column.

Now I will click on one of the Headers and you will see that reverse sorting is applied.

sorting using AngularJS

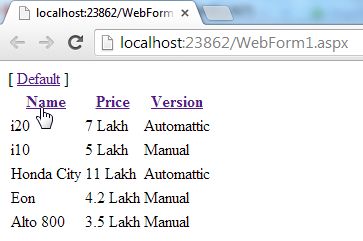
This is because by default reverse sorting was made available in the JavaScript.

Now I will click on one of the Headers and again sorting will be done.

sorting using AngularJS

Now if I click on the Default Anchor then everything will be reset to it’s default position.

sorting using AngularJS

The complete code of this application is as follows:

<html ng-app xmlns="http://www.w3.org/1999/xhtml">

<head runat="server">

    <title></title>

    <script src="angular.min.js"></script>

    <script>

        function x($scope) {

            $scope.cars =

                [{ name: 'Alto 800', price: '3.5 Lakh', version: 'Manual' },

                 { name: 'Eon', price: '4.2 Lakh', version: 'Manual' },

                 { name: 'i20', price: '7 Lakh', version: 'Automattic' },

                 { name: 'Honda City', price: '11 Lakh', version: 'Automattic' },

                 { name: 'i10', price: '5 Lakh', version: 'Manual' }]

            $scope.sorting = '-version';

        }

    </script>

</head>

<body>

 <div ng-app>

  <div ng-controller="x">

    [ <a href="" ng-click="sorting=''">Default</a> ]

    <table class="car">

      <tr>

        <th><a href="" ng-click="sorting = 'name'; reverse=!reverse">Name</a>

        <th><a href="" ng-click="sorting = 'price'; reverse=!reverse">Price</a></th>

        <th><a href="" ng-click="sorting = 'version'; reverse=!reverse">Version</a></th>

      </tr>

      <tr ng-repeat="car in cars | orderBy:sorting:reverse">

        <td>{{car.name}}</td>

        <td>{{car.price}}</td>

        <td>{{car.version}}</td>

      </tr>

    </table>

  </div>

</div>

</body>

</html>

OnInit Interfaces In Angular

Introduction

 In this article, we are going to see what is ngOninit() method, when and why to use ngOnInit() method. Prerequisites

  • HTML, CSS, and JS
  • Basics of TypeScript.
import { Component, OnInit } from '@angular/core';  
import { Http } from '@angular/http';  
  
@Component({  
  selector: 'app-posts',  
  templateUrl: './posts.component.html',  
  styleUrls: ['./posts.component.css']  
})  
export class PostsComponent implements OnInit {    
 posts: any[];  
 private url = 'http://jsonplaceholder.typicode.com/posts';  
  constructor(private http: Http)   
  {  
    http.get(this.url)  
    .subscribe(response=> {  
      console.log(response.json());  
      this.posts = response.json();  
    });  
  }  
  
  ngOnInit() {  
  }  
 }  

As a best practice we should have a constructor of very small and light weight. We should not perform expensive operations like calling of server. Then when can we call it? Components in Angular have  lifecycle hooks. There are special methods that we can add to Angular, and Angular  will call these methods at specific times during the lifecycle of the component. 

To learn more about features of AngularJS, you can enroll for a live demo on Angularjs Online Training

Lifecycle Hooks

 When Angular

  1. Creates a Component
  2. Renders it
  3. Creates and renders its children
  4. Destroys a component

These are lifecycle events. Angular will call specific methods if they are defined. One of its methods is  called ngOnInit. 

OnInit interface

 Defined under @angular/core library,

Interface OnInit {  
   ngOnInit(): void  
}  

This interface declares a method called ngOnInit which takes no arguments and returns void. This is the method that Angular calls when it initializes the component. OnInit is an interface that refers to the lifecycle hook. There are multiple lifecycle hooks in Angular:

  1. OnInit
  2. OnChanges
  3. DoCheck
  4. AfterContentInit

Each of these interfaces declares a method with the same name prefix with ng . So for OnInit we have a method called ngOnInit. 

Take your career to new heights of success with Angular Training

OnInit

 Technically we don’t need to implement OnInit interface on the top as long as we have a method called ngOnInit() defined in our class. Angular will automatically call this when it initializes our component but we use implement OnInt interface to add compile time checking, so when we define implement OnInit interface typescript ensures that we have a method called ngOnInit. So the lesson is, o not call the http services inside constructors. If you want initialization then do that in ngOnInit method.

import { Component, OnInit } from '@angular/core';  
import { Http } from '@angular/http';  
  
@Component({  
  selector: 'app-posts',  
  templateUrl: './posts.component.html',  
  styleUrls: ['./posts.component.css']  
})  
export class PostsComponent implements OnInit {    
 posts: any[];  
 private url = 'http://jsonplaceholder.typicode.com/posts';  
  constructor(private http: Http)   
  {  
      
  }  
  
  ngOnInit() {  
    this.http.get(this.url)  
    .subscribe(response=> {  
    console.log(response.json());  
      this.posts = response.json();  
    });  
  }  
 }  

Get More Info Here Angular Certification

How to Create Array of Objects in Java

What Is An Array Of Objects?

JAVA ARRAY OF OBJECT, as defined by its name, store an array of objects. Unlike a traditional array that store values like string, integer, Boolean, etc an array of objects stores OBJECTS. The array elements store the location of the reference variables of the object.

To get in-Depth knowledge on Java you can enroll for a live demo on core Java Online Training

Syntax:

Class obj[]= new Class[array_length]

Example: To create Array Of Objects
Step 1) Copy the following code into an editor

class ObjectArray{
   public static void main(String args[]){
     Account obj[] = new Account[2] ;
     //obj[0] = new Account();
     //obj[1] = new Account();
    obj[0].setData(1,2);
    obj[1].setData(3,4);
    System.out.println("For Array Element 0");
    obj[0].showData();
    System.out.println("For Array Element 1");
     obj[1].showData();
  }
}
class Account{
  int a;
  int b;
 public void setData(int c,int d){
   a=c;
   b=d;
 }
 public void showData(){
   System.out.println("Value of a ="+a);
   System.out.println("Value of b ="+b);
 }
}

Step 2) Save , Compile & Run the Code.

Step 3) Error=? Try and debug before proceeding to step 4.

Step 4) The line of code, Account obj[] = new Account[2]; exactly creates an array of two reference variables as shown below

Take your career to new heights of success with Java Training

Java Array

Step 5) Uncomment Line # 4 & 5. This step creates objects and assigns them to the reference variable array as shown below. Your code must run now.

Java Array

Output:

For Array Element 0
Value of a =1
Value of b =2
For Array Element 1
Value of a =3
Value of b =4

Get More Info Java Certification Course

What is Java library

A Java library is a byte code based on virtual-machine. It helps to encode the classes within the library. Here, a library is a collection of different classes. Java Class Library is a pack of dynamic libraries that are loadable at the time of running Java applications. There are many different and some important collection of Java class library which can be discussed further.

There are thousands of libraries which gives free usage. The following are the few Java libraries. 

  1. Java Standard libraries: These libraries are very powerful to use but are most underrated libraries. These can be used for any work like sending and receiving HTTP requests to manage different type of applications. Some other third party libraries are also available like GSON and Guava. Some of these important libraries are java.lang, java.io, java.math, java.util, etc.  
  2. Apache commons: This is the best multipurpose Java library. It is like Java standard library. It is almost useful for every work. It helps to work with typical files like .zip, .tar, .rar, etc. It helps in creating and modifying spreadsheets. It can be useful for some other functions like image processing, FTP, VFS, IO, logging, ZIP, etc. Other workings like emailing, statistics, HTTP request, etc. Are also get support from this library.
  3. Hibernate: This library features are used to map Java classes with relational databases like MySQL. It provides an easy abstract of data in relational database.  It uses JDBC for its implementation.
  4. JHipster: It is a development platform to create and deploy different applications and services like Spring Boot and Angular web applications. It also includes Spring microservices.
  5. Maven: It is software project management tool. It can manage all project configurations and documentation using a single pom.xml file.
  6. Guava: It is also known as Google Core libraries for Java. It is an extension of basic Java collections.
  7. Google-GSON: This is very helpful library to convert Java objects to JSON. This is helpful in developing mobile applications along with creating REST APIs. These helps to convert Java objects into JSON files. 
  8. JUnit: It is a free Java framework useful for writing unit tests. It provides functional support to the repeatable tests. 
  9. Mockito: This library enables us to create and write mock tests easily with simple codes. Writing better and great tests is not an easy task.

To get in-Depth knowledge on Java you can enroll for a live demo on Core Java Online Training

Java library example

Other than the above there are some open-source libraries available such that Logging libraries, JSON parsing libraries, general purpose libraries, Unit test libraries, HTTP libraries, XML parsing libraries, excel reading libraries, messaging libraries, bytecode libraries. These are the various examples of Java library.

These libraries serve different purposes for the developers of Java. It also helps the people associated with Java and its different libraries.  

Logging libraries: These libraries are common to use in every project. They play an important role in server-side applications. These logs can be placed to look into the activity going on applications. Java developers should be aware of the advantages and disadvantages of logging libraries.

General-purpose libraries: There are some general purpose good libraries available to Java programmers such as Apache Commons and Google Guava. These helps to simplify a lot of things in the projects.

JSON parsing libraries: It is helpful in web services. JSON is a protocol that carries information from client to the server. It is a replacement for XML which is commonly used for transferring information files. The developers should know at least one of these libraries. 

Take your career to new heights of success with Java Training

Unit Test Libraries: These libraries help in creating and writing unit tests. These include Mockito, Powermock, JUnit, etc.

HTTP libraries: It helps in creating HTTP connection using different classes in java.net package. The Java developer must know about the HTTP client libraries.

XML parsing libraries: These libraries include JAXP, JAXB, Xerces,  Xstream, etc. Xerces 2 is the next generation framework that is fully compatible with XML parsing library features.

Messaging libraries: It is similar to the logging and database connection. It has some common features of Java applications. It offers JMS services that require separate jms.jar file. 

Bytecode libraries: These libraries helps in reading and modifying bytecodes those generated from various applications. There are few popular bytecodes in Java world such as Javaassist and Cglip Nodep. The Javaassist helps in Java bytecode manipulations.

Java library functions

Java library functions are the inbuilt functions that are present in Java library classes. It helps programmers to perform their tasks very easily. There are different functions of Java library such as java.io, java.util, java.math, java.lang, java.net, java.awt, etc. These are the different classes in Java. These are useful for various purposes.  Using these functions, developers can do any task easily. Thus, these are the most useful and standard function of Java Library. Developers can use these functions to alter the complex program situations.

Java library class advantages

  • It helps to reduce the size of the classes.
  • It cleans the APIs that helps to protect internal fields’ leakage.
  • Useful for testing libraries other than applications.
  • Helps to reuse these libraries for different projects.
  • Objects and their corresponding classes compress the complex programs into small problems.
  • Helps independent objects to communicate with each other.
  • It gives easy to find location of each class.
  • It provides easy access control.
  • It also provides user friendly application experience.
  • It offers multilingual support.

These are the few advantages of java class library. It helps the developers to work easily with these libraries. It makes applications and its related things smoother to use. 

Java library packages

In simple terms, Java library is a collection of different packages which contains classes and interfaces. The Java library packages are divided into two categories such as; Built-in packages, User-defined packages.

Built-in packages

The built-in packages include Java API. Java API is prewritten library class. It also includes Java development environment. This library includes the components for input management, database program, etc. To use this class or library, it needs a keyword known as import.

User-defined packages

Here, the Java library uses a file system directory to store the packages. Here package keyword is used to create a package.

For example,

└── root

  └── mypack

    └── MyPackageClass.java 

The top Java packages are as follows.

Org.apache.hadoop

Org.apache.commons

Org.apache.camel

Org.apache.http

Com.google.common

Org.pentaho

The above Java packages help the developers in various ways. They serve different purposes for different functions. Each library has different values. 

Thus, the above writings explain the importance of Java library and the different functions and uses of this library. These are the collection of different classes which helps in running Java applications smoothly. There are different Java class libraries which include various functions that help Java developers in many ways. Every developer must know about these libraries in a better way to implement the right things. It is important to learn the updates also regarding these functions to serve better in this field.

One, who wants to learn Java and its different purposes to the IT development field, can go through Java Online Training. This helps to enhance the skills in Java and one can make a better career in this regard. Learning Java and its different functions helps well to the newbie in the field of software development. 

What is new in MicroStrategy 10.11?

MicroStrategy is a leading global provider of enterprise analytics and mobility software. Recently it has announced the general availability of MicroStrategy 10.11. Moreover, the company’s newest MicroStrategy 10 TM features release. This feature release continues to add strength to the MicroStrategy 10. Thus, this product line includes enhanced mapping with Map box. Moreover, it is a leading location data network for mobile and web applications. Thus, you can perform Geo-spatial analysis.

The location data changes the manner people and products travel around the world. Then the latest features of Geo-spatial Services enable businesses to make location-driven decisions. That can change their operations and affect their result.

To get in-Depth knowledge on Microstrategy you can enroll for a live demo on Microstrategy Training

MicroStrategy 10.11 new features

Version 10.11 also adds new out-of-the-box visualizations, smart content suggestions. Besides, it also includes folder reminders, a MicroStrategy mobile library feature and more.

You may be learning about releasing version 10.11 and all the powerful new features it offers. Business teams can now take the first step. They can create their own, enterprise-wide, data-driven culture. Version 10.11 empowers self-service data discovery and departmental analytics teams. Thus it provides the basis for controlled scale data discovery and business-worthy analytics. The new capabilities available in MicroStrategy 10.11 are key to applications. It shows dedication to delivering next-generation market analytics. Thus, you can advance our goal of creating the Intelligent Enterprise platform.

Using the Latest MicroStrategy 10.11 Library App to explore mobile files

Besides, this is to leverage the responsive design capabilities of MicroStrategy. This allows folders to render on different devices and form factors. Moreover, users can now interact with the data on folders through native apps. This is to optimize for IOS and Android smart phones through workflows on devices. MicroStrategy customers will now perform the new and innovative interfaces. Users can access the IPhone’s MicroStrategy Library app by visiting the app store. Besides, you can also access Android’s Library app, via the Google Play app store.

New Geo-spatial Services MicroStrategy provides by Map box Amplifies Location Intelligence

MicroStrategy 10.11 introduces MicroStrategy Geo-spatial Services. Then it offers new mapping features through a native Map box integration. There is new and improved map visualization on all platforms. This includes the following.:

  • MicroStrategy Desktop TM,
  • Workstation,
  • Web TM,
  • MicroStrategy Mobile TM and
  • MicroStrategy Library is available for dossiers.

This is for advanced mapping capabilities. Users can imagine and analyze spatial data including intelligent clustering and aggregation. Besides this, it also analyzes dynamic layers with interactive zoom, attribute thresholds. Apart from out-of-the-box ESRI maps, this mapping service provides support for markers, bubbles. It also provides area types on a variety of map styles.

Vector Based maps

Geo-spatial Services with Micro-Strategy 10.11 doubles existing features through vector maps. Then also offers users greater accuracy and faster performance on position data. This covers all U.S. zip codes and postal codes for over 150 countries worldwide. Version 10.11 also offers several map type choices. These include simple, white, yellow, dark, street, and topographic. Besides also supports physical, relief, satellite, and street types. Additionally, users can exploit correct clusters, aggregations and layers of zoom. Thus, make comprehension of Geo-spatial data simple. Analysts can use these to view specific data layers at different zoom levels. Users can also add color levels to the attributes or measurements. This is to make business dimensions on a map more distinguished.

Take your career to new heights of success with Microstrategy Courses

Real-time location data

The ability for MicroStrategy and its customers to imagine at a scale is important. Moreover, with location data changing the manner in people around the world. Thus provides the latest features of the Geo-spatial Services. Besides, enable businesses to make location-driven decisions. These decisions can change their operations and impact their end result.”

Most businesses collect location data sets on a larger scale. These intelligence platforms such as MicroStrategy allow information aggregation. Then drill down support to make data analysis possible. Many companies are searching for specific, actionable outcomes when talking about location analytics. Moreover, you can identify new customers; improve marketing efforts and customer service. Besides, you can manage risks, and recognize consumer data, among others. Map box’s new integration empowers MicroStrategy 10.11 users. This is to gain more insight without compromising security.”

Discover ideas that help specific use cases with new out-of-the-box visualizations

MicroStrategy 10.11 introduces three new visualizations. This is to extend the capabilities of visual analytics for new use cases. With this latest release, users can use waterfall, histogram. Then box plot visualizations to plot and interact with data. Moreover, all, which is out-of-the-box accessible across all MicroStrategy, interfaces.

Visualization allows users to display the value of the data over time, resulting in a final value. This function is useful for quantitative analysis. This is as it helps investors to analyze the individual variables. Moreover, affect a statistic of interest, such as the various cost and revenue sources. Thus, generate the bottom line of a business.

Histogram

The histogram represents a metric’s frequency distribution. This helps to check important summary statistics. Besides, it is also mean and mode, recognize potential outliers. Then familiarize data with a variable distribution before carrying out further study.

Plot Box

The plot box is a common way of displaying the distribution over time of many variables. The variables are based on a metric’s quarter and median values. It is important to the visual display of potential outliers. This is to detect variation over time or variance between similar variables. Then you can determine a variable’s range of values.

Besides, organizations can take advantage of MicroStrategy 10.11 outline mode. This allows users to display and communicate with hierarchical data on a grid. Within each hierarchy level, users can summarize several rows of data. This is by collapsing and extending the hierarchy groups within the grid.

Dossier new features reflect a leap forward in user performance

MicroStrategy 10.11 for Dossier introduces many new features. This is to support higher performance on larger datasets. Users can now leverage dossier prompts to limit the data displayed on a folder. In addition, it speeds up output by processing only the data you need. This prompts help to personalize information by disclosing only relevant data.

Users can pause and restart execution of dossiers with version 10.11. This is while updating or developing a dossier to maximize development time. Then can prevent the dossier from processing or executing the visualization. This enables users to create or edit unrelated dossiers. This is especially important when working with live connections to sources. Besides, also useful for large datasets, or slower connections. Once you make all changes, execution of dossiers can resume. Moreover, this offers greater flexibility and faster performance.

New features for MicroStrategy 10.11 on AWS Allows Environmental Monitoring Administrators

The latest release introduces new features on AWS for MicroStrategy. These features streamline administration. Administrators may display usage statistics across different instances and facilities. This includes information such as CPU and memory usage, number of database connections. Then free storage space all within a single interface. Administrators may make informed decisions to automate tasks with schedules. Then you can simplify or scale up their usage-based environments.

Extra improvements in MicroStrategy 10.11

The latest version of the app also includes hundreds of extra improvements. These improvements include the follows.

  • New MicroStrategy 10.11 Library feature that offers end-user suggestions. This is by recommending relevant dossiers based on similarities to the content selected.
  • Out-of-the-box R Integration Pack is available in MicroStrategy Desktop and MicroStrategy Workstations as well. This allows analysts to integrate R predictive insights. Moreover, it is easy without downloading the R Integration Pack.

Conclusion

I hope you reach a conclusion about MicroStrategy 10.11. You can learn more through MicroStrategy online training.

@ViewChild In Angular

@ViewChild

 In Angular, if we want to access the template information; i.e, any element from the html file in the ts file or in our component the we can choose the @viewchild concept. By using @viewchild we can achieve the following things,

  • Accessing template of same component
  • Accessing the template of child component

Syntax of creating the @viewchild variable@ViewChild(‘templaterefvariable’’,{static : true}) mytxt : ElementRef In the above @ViewChild will be accepting two arguments and the first is about a string which has to be our template reference variable. My variable name is “mytxt” which is of type “ElementRef”.

To get in-Depth knowledge on Angularjs you can enroll for a live demo on Angularjs Online Training

Accessing template of same component

 Let’s firstly create our application. By default we’ll be having our app component. App.Component.html 

<div class="row">  
   <input #txtname type="text">  
   <button (click)="MyFunc(txtname.value)" >Click Me</button>  
</div>  

In the above html piece of code, we can find the “#txtname” which is nothing but my template reference variable name. On click of button I passed the parameter as “txtname.value” so that whenever user clicks the button it triggers the “MyFunc” function which will be in our component file.

App.Component.ts

import {  
    Component,  
    ViewChild,  
    ElementRef  
} from '@angular/core';  
@Component({  
    selector: 'app-root',  
    templateUrl: './app.component.html',  
    styleUrls: ['./app.component.css']  
})  
export class AppComponent {  
    title = 'Temprefapp';  
    @ViewChild('txtname', {  
        static: true  
    }) mytxt: ElementRef  
    MyFunc(val) {  
        debugger;  
        console.log(this.mytxt.nativeElement.value);  
    }  
}  

Firstly to get the @viewchild class we need to import the ViewChild from the ‘@agular/core’ library. You can observe “mytxt” variable which is of type “ElementRef” and decorated with @ViewChild. Within the function Myunc function I can access the element value directly by using the ElementRef property named “nativeElement”. 

By using the viewchild concept we can also access the elements, properties or methods of the child component. In this scenario, let’s take a new component named as Secondcomponent. 

Take your career to new heights of success with Angular Training

Now let’s use the secondcomponents selector in the appcomponent as like below, 

import {  
    Component  
} from '@angular/core';  
@Component({  
    selector: 'app-secondcomponent',  
    templateUrl: './secondcomponent.component.html',  
    styleUrls: ['./secondcomponent.component.css']  
})  
export class SecondcomponentComponent {  
    constructor() {}  
    Test() {  
        debugger;  
        return "hello";  
    }  
}  

SecondComponent.html

<p>secondcomponent works!</p>  

Now let’s use this second component in our main appcomponent.html with the help of selector “app-secondcomponent” so that our appcomponent.html looks as like below :

<div class="row">  
   <input type="text"><br/>  
<button >Click Me</button>  
</div>  
<app-secondcomponent></app-secondcomponent>  

Now, let’s make use of @viewchild to access the “Test()” in appcomponent.

import {  
    Component,  
    ViewChild,  
    ElementRef,  
    OnInit,  
    AfterViewInit  
} from '@angular/core';  
import {  
    SecondcomponentComponent  
} from './secondcomponent/secondcomponent.component';  
@Component({  
    selector: 'app-root',  
    templateUrl: './app.component.html',  
    styleUrls: ['./app.component.css']  
})  
export class AppComponent implements AfterViewInit {  
    title = 'Temprefapp';  
    @ViewChild(SecondcomponentComponent, {  
        static: false  
    }) vcvariable: SecondcomponentComponent  
    ngAfterViewInit() {  
        debugger;  
        console.log(this.vcvariable.Test());  
    }  
}  

In the above code if we observe, @viewchild was taking the first argument as component name and in the ngAfterViewInint() we accessed the Test(). 

Not only “ngAfterViewInit”, but we can also access the elements info or properties or functions of child component in any of our user defined functions like button click triggering functions.

Get More Info Here angularjs online course

Why do we need Resolver?

Suppose you are building an awesome app where you load fetch, update, insert, and delete data from backend off course through the API services. Many times, we need to pass the data between two routes, or it may be the case that our ‘Y’ component needs data that is loaded by the ‘X’ component. In simple words, you have a cake shop app and you want to load all the cakes from the backend or from some other component. In all the above scenarios, if you have not made any special adjustment for data loading, you will face error/warning in the browser, as shown below.

In the above case, I have cakeStockID as a defined property in Model.

The reason behind this is it doesn’t get the data before rendering the HTML. i.e. our HTML loads before fetching data from the back end.

This situation can be eliminated in different ways, but we have a Resolve interface provided by angular.

So to handle this situation we will wait for the data to be load and then proceed further. Let’s do it by the resolver.

To get in-Depth knowledge on Angular you can enroll for a live demo on Angular Online Training

Our steps will be:

Create a Resolver ====> give that resolver object while routing ====> fetch loaded data via resolver in constructor of consuming constructor.

My scenario: I want to load all the cakes from the backend via resolver.

Step 1

Let’s create a standalone component for the resolver, as shown below:

import {  
    Injectable  
} from '@angular/core';  
import {  
    Resolve,  
    ActivatedRouteSnapshot,  
    RouterStateSnapshot  
} from '@angular/router';  
import {  
    showcaseCakesModel  
} from '../rollin-shared/showcase-cakes.model';  
import {  
    rollinDataStorageService  
} from '../Services/rollin-datastorage';  
import {  
    Observable  
} from 'rxjs'  
@Injectable({  
    providedIn: 'root'  
})  
export class dataResolverService implements Resolve < showcaseCakesModel[] > {  
    constructor(private svcObj: rollinDataStorageService) {}  
    resolve(route: ActivatedRouteSnapshot, state: RouterStateSnapshot): Observable < showcaseCakesModel[] > | showcaseCakesModel[] {  
        return this.svcObj.get();  
    }  
}  

svcObject is my service object from where I am fetching the data.

So here, we are calling our get method. Ultimately, we want this data to be loaded as soon as we load the component.

Step 2

There is a way to tell Angular, ‘Hey buddy! I want to load this data first via resolver whenever the ‘XYZ’ component is loaded.’ For that, we need to mention this resolver name as a parameter in routing, as shown below.

In my scenario: I want to load all the cakes from backend via resolver in ViewAllCakeComponent.

import { dataResolverService } from './rollin-cakes/data-resolver';  
  
const rollinRoute: Routes=[    
    {path:'',component:RollinAppComponent,pathMatch:'full',resolve:{data:dataResolverService}},    
    {path:'view-allcakes',component:ViewAllcakesComponent,pathMatch:'full',resolve:{data:dataResolverService}}    
 ]    

Here, we are giving ‘data’ as a key to retrieve the loaded data by the resolver. You can give it any other name also.

Take your career to new heights of success with Angular Training

Step 3

So, all good until now! Let’s use this in our component where we want to load data before anything. To do that, we need to inject this resolver in the component.

In the constructor, it self-retrieves data loaded by the resolver from ActivatedRoute, as shown below.

This is quite relatable. If you look at resolve interface carefully, you will find its first parameter is ActivtedRouterSnapshot..

import { Component, OnInit, DoCheck } from '@angular/core';    
import { cakesTransactionService } from '../cake-transactions';    
import { showcaseCakesModel } from 'src/app/rollin-shared/showcase-cakes.model';    
import { rollinDataStorageService } from 'src/app/Services/rollin-datastorage';    
import { Router, ActivatedRoute } from '@angular/router';    
    
@Component({    
  selector: 'app-view-allcakes',    
  templateUrl: './view-allcakes.component.html',    
  styleUrls: ['./view-allcakes.component.css']    
})    
export class ViewAllcakesComponent implements OnInit {    
  displayCakes:showcaseCakesModel[];    
    
  constructor(private route:Router,    
              private actRoute:ActivatedRoute,     
              private cakeObj:rollinDataStorageService,    
              private cakeTransactionServiceObj:cakesTransactionService) {     
    //console.log("called Constructor")    
    
    this.displayCakes= this.actRoute.snapshot.data['data'];    
    
    //console.log( this.displayCakes);    
  }      
  ngOnInit(): void {  
  }      
}   

It’s done! Now going forwards, whenever this component is called, this data will be ready for us!

Angle Bracket in Java with Examples

Angle Bracket in Java is used to define Generics. It means that the angle bracket takes a generic type, say T, in the definition and any class as a parameter during the calling. The idea is to allow type (Integer, String, … etc and user-defined types) to be a parameter to methods, classes, and interfaces. For example, classes like HashSet, ArrayList, HashMap, etc use generics very well. We can use them for any type.

Example:

<T> // of type T
<Integer> // of type Integer
<String> // of type String
<MyClass> // of type MyClass
.
.

How to use angle bracket with Class?:

We use angle brackets ‘<>’ to specify parameter types in generic class creation. To create objects of a generic class, we use the following syntax:

To get in-Depth knowledge on Java you can enroll for a live demo on Java Online Training

// To create an instance of generic class 
BaseType  obj = new BaseType ()

Note: In Parameter type,
      we can not use primitives like 
      'int', 'char' or 'double'.
// A Simple Java program 
// to show working of user defined 
// Generic classes 

// We use < > to specify Parameter type 
class Test<T> { 

	// An object of type T is declared 
	T obj; 

	// constructor 
	Test(T obj) 
	{ 
		this.obj = obj; 
	} 

	public T getObject() 
	{ 
		return this.obj; 
	} 
} 

// Driver class to test above 
class Main { 
	public static void main(String[] args) 
	{ 
		// instance of Integer type 
		Test<Integer> iObj 
			= new Test<Integer>(15); 
		System.out.println(iObj.getObject()); 

		// instance of String type 
		Test<String> sObj 
			= new Test<String>("OnlineITGuru"); 
		System.out.println(sObj.getObject()); 
	} 
} 

Output:

15
OnlineITGuru

Take your career to new heights of success with Java Training

How to use angle bracket with Function?:

We use angle brackets ” to specify parameter types in the generic function definition. Then to call the function, we just pass the expecter type as a parameter. We can also write generic functions that can be called with different types of arguments based on the type of arguments passed to the generic method, the compiler handles each method.

// To create a generic function
public static  void func(T a, T b){}

Note: In Parameter type,
      we can not use primitives like 
      'int', 'char' or 'double'.
// A Simple Java program 
// to show working of user defined 
// Generic functions 

class Test { 
	// A Generic method example 
	static <T> void genericDisplay(T element) 
	{ 
		System.out.println( 
			element 
				.getClass() 
				.getName() 
			+ " = " + element); 
	} 

	// Driver method 
	public static void main(String[] args) 
	{ 
		// Calling generic method 
		// with Integer argument 
		genericDisplay(11); 

		// Calling generic method 
		// with String argument 
		genericDisplay("OnlineITGuru"); 

		// Calling generic method 
		// with double argument 
		genericDisplay(1.0); 
	} 
} 

Output:

java.lang.Integer = 11
java.lang.String = GeeksForGeeks
java.lang.Double = 1.0

Get More Info On java certification course

Java – Generics

It would be nice if we could write a single sort method that could sort the elements in an Integer array, a String array, or an array of any type that supports ordering.

Java Generic methods and generic classes enable programmers to specify, with a single method declaration, a set of related methods, or with a single class declaration, a set of related types, respectively.

Generics also provide compile-time type safety that allows programmers to catch invalid types at compile time.

Using Java Generic concept, we might write a generic method for sorting an array of objects, then invoke the generic method with Integer arrays, Double arrays, String arrays and so on, to sort the array elements.

To get in-Depth knowledge on Java you can enroll for a live demo on Java Online Training

Generic Methods

You can write a single generic method declaration that can be called with arguments of different types. Based on the types of the arguments passed to the generic method, the compiler handles each method call appropriately. Following are the rules to define Generic Methods −

  • All generic method declarations have a type parameter section delimited by angle brackets (< and >) that precedes the method’s return type ( < E > in the next example).
  • Each type parameter section contains one or more type parameters separated by commas. A type parameter, also known as a type variable, is an identifier that specifies a generic type name.
  • The type parameters can be used to declare the return type and act as placeholders for the types of the arguments passed to the generic method, which are known as actual type arguments.
  • A generic method’s body is declared like that of any other method. Note that type parameters can represent only reference types, not primitive types (like int, double and char).

Example

Following example illustrates how we can print an array of different type using a single Generic method

public class GenericMethodTest {
   // generic method printArray
   public static < E > void printArray( E[] inputArray ) {
      // Display array elements
      for(E element : inputArray) {
         System.out.printf("%s ", element);
      }
      System.out.println();
   }

   public static void main(String args[]) {
      // Create arrays of Integer, Double and Character
      Integer[] intArray = { 1, 2, 3, 4, 5 };
      Double[] doubleArray = { 1.1, 2.2, 3.3, 4.4 };
      Character[] charArray = { 'H', 'E', 'L', 'L', 'O' };

      System.out.println("Array integerArray contains:");
      printArray(intArray);   // pass an Integer array

      System.out.println("\nArray doubleArray contains:");
      printArray(doubleArray);   // pass a Double array

      System.out.println("\nArray characterArray contains:");
      printArray(charArray);   // pass a Character array
   }
}

This will produce the following result

Array integerArray contains:
1 2 3 4 5 

Array doubleArray contains:
1.1 2.2 3.3 4.4 

Array characterArray contains:
H E L L O

Bounded Type Parameters

There may be times when you’ll want to restrict the kinds of types that are allowed to be passed to a type parameter. For example, a method that operates on numbers might only want to accept instances of Number or its subclasses. This is what bounded type parameters are for.

To declare a bounded type parameter, list the type parameter’s name, followed by the extends keyword, followed by its upper bound.

Take your career to new heights of success with Java Training

Example

Following example illustrates how extends is used in a general sense to mean either “extends” (as in classes) or “implements” (as in interfaces). This example is Generic method to return the largest of three Comparable objects

Live Demo
public class MaximumTest {
   // determines the largest of three Comparable objects
   
   public static <T extends Comparable<T>> T maximum(T x, T y, T z) {
      T max = x;   // assume x is initially the largest
      
      if(y.compareTo(max) > 0) {
         max = y;   // y is the largest so far
      }
      
      if(z.compareTo(max) > 0) {
         max = z;   // z is the largest now                 
      }
      return max;   // returns the largest object   
   }
   
   public static void main(String args[]) {
      System.out.printf("Max of %d, %d and %d is %d\n\n", 
         3, 4, 5, maximum( 3, 4, 5 ));

      System.out.printf("Max of %.1f,%.1f and %.1f is %.1f\n\n",
         6.6, 8.8, 7.7, maximum( 6.6, 8.8, 7.7 ));

      System.out.printf("Max of %s, %s and %s is %s\n","pear",
         "apple", "orange", maximum("pear", "apple", "orange"));
   }
}

This will produce the following result

Output

Max of 3, 4 and 5 is 5

Max of 6.6,8.8 and 7.7 is 8.8

Max of pear, apple and orange is pear

Generic Classes

A generic class declaration looks like a non-generic class declaration, except that the class name is followed by a type parameter section.

As with generic methods, the type parameter section of a generic class can have one or more type parameters separated by commas. These classes are known as parameterized classes or parameterized types because they accept one or more parameters.

Example

Following example illustrates how we can define a generic class

Live Demo
public class Box<T> {
   private T t;

   public void add(T t) {
      this.t = t;
   }

   public T get() {
      return t;
   }

   public static void main(String[] args) {
      Box<Integer> integerBox = new Box<Integer>();
      Box<String> stringBox = new Box<String>();
    
      integerBox.add(new Integer(10));
      stringBox.add(new String("Hello World"));

      System.out.printf("Integer Value :%d\n\n", integerBox.get());
      System.out.printf("String Value :%s\n", stringBox.get());
   }
}

This will produce the following result

Output

Integer Value :10
String Value :Hello World

Read More Here java certification course

Use Of Event Emitter

Event Emitter

 Event-emitter is imported from the “@anguar/core” package. It is used in directives and components to emit custom events synchronously or asynchronously and register handlers for those events by subscribing to an instance. So to use this feature we will create 2 components,

  1. UserList Component (Child)
  2. User Component(Parent)

In User Component we will have one textbox and 2 buttons, which are Add and Remove. On click of these two buttons, we will display the username in ListComponent which is a child component. We will integrate List and User component in AppComponent and event will get fired by using event emitter. (AppComponent.Html) In App Component, we are integrating UserList and UserComponent. We will display data into UserList Component page which will be used by template variable “ListValue” which is input for UserList Component page and that will get updated whenever any event will be fired in UserComponent.

To get in-Depth knowledge on Angularjs you can enroll for a live demo on Angularjs Online Training

<header></header>  
   <div>  
   <hello></hello>  
      <user-list [listValue] = "listData"></user-list>  
      <user-component (userData) = "AddData($event)"></user-component>  
</div>  

(AppComponent.ts) AddData() is an function which will be triggered automatically whenever any event will be performed into UserComponent Page.

import { Component } from '@angular/core';  
@Component({  
   selector: 'my-app',  
   templateUrl: './app.component.html',  
   styleUrls: [ './app.component.css' ]  
})  
export class AppComponent {  
   listData = [];  
   AddData(arr:any[]){  
      this.listData=arr;  
   }  
}  

(UserListCompoenent.Html) 

UserList Component will display the data. Here ListValue is an input variable which is getting updated on click of Add and Remove button in UserComponent.

Take your career to new heights of success with Angular Training

<div *ngFor="let data of listValue">  
   <span class="d-block p-2 bg-dark text-white margin10px comment">{{data}}</span>  
</div>

(UserListComponent.ts)

import { Component,Input } from '@angular/core';  
@Component({  
   selector: 'user-list',  
   templateUrl: './list.component.html',  
   styleUrls: [ '../app/app.component.css' ]  
})  
export class ListComponent {  
   @Input() listValue = [];  
}  

(UserComponent.Html)

<html>  
   <head>  
      </head>  
         <div>  
            <div class="input-group input-group-lg">  
               <input type="text" class="form-control margin10px comment" placeholder="Type UserName..." aria-label="Sizing example input" aria-describedby="inputGroup-sizing-lg" #userName>  
               <button type="button" class="btn btn-success margin10px" (click)="AddMessage(userName)">add</button>  
               <button type="button" class="btn btn-success margin10px" (click)="RemoveMessage(userName)">remove</button>  
            </div>  
      </div>  
</html>  

(UserComponent.ts) 

UserData name should be same as given in appcomponent .html page. UserData is an output event. Here the event emitter will play their role.

this.userData.next(this.listUser);  

Next function will call AddUser function of appcomponent.ts page with the use of next function of event emitter.

import { Component,Output,EventEmitter } from '@angular/core';  
@Component({  
   selector: 'user-component',  
   templateUrl: './user.component.html',  
})  
export class UserComponent {  
   @Output() userData = new EventEmitter();  
   listUser:any=[];  
AddMessage(userName:HTMLInputElement){  
   this.listUser.push(userName.value);  
   this.userData.next(this.listUser);  
}  
RemoveMessage(userName:HTMLInputElement)  
   {  
      var index = this.listUser.indexOf(userName.value);  
      if (index !== -1) {  
         this.listUser.splice(index, 1);  
      }  
   this.userData.next(this.listUser);  
   }  
}  

Now we will register User and List component into (App.Module.ts) file,

import { NgModule } from '@angular/core';  
import { BrowserModule } from '@angular/platform-browser';  
import { FormsModule } from '@angular/forms';  
import { ListComponent } from '../list/list.component'  
import { UserComponent } from '../user/user.component';  
import { AppComponent } from './app.component';  
import { HelloComponent } from './hello.component';  
  
@NgModule({  
   imports: [ BrowserModule, FormsModule ],  
   declarations: [ AppComponent, HelloComponent ,ListComponent,UserComponent],  
   bootstrap: [ AppComponent ]  
})  
export class AppModule { }  

Get More Info On Angularjs Online Course

Design a site like this with WordPress.com
Get started