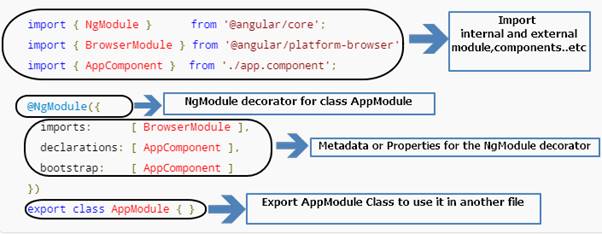
Basics Of Data Binding In Angular

Data Binding in Angular is the communication between the Typescript code of a component that contains the business logic and the View or Template which contains HTML markup. In other words, it is moving data from component class properties to HTML element properties.

Types of Data Binding – String Interpolation & Property Binding

String Interpolation

Any expression that can be resolved into a string is called string interpolation. It has to resolve to a string at the end. String Interpolation flows data in one direction. Angular converts interpolation to property binding.

Syntax: {{data}}
Example:

To get in-Depth knowledge on Angularjs you can enroll for a live demo on Angularjs Online Training

Property Binding

Property Binding can be One Way and Two Way Binding.

Syntax: [property]=”data”
Example:

When to use Interpolation and Property Binding

To concatenate strings we must use interpolation instead of property binding.

To set a property to a non string data value, property binding must be used.

Two-way data binding uses both property and event binding. It is a simple way of reacting to events in both directions. The data is synchronized continuously from the component to the view and from the view to the component.

Syntax: [()]
Example: [(ngmodel)]=”userName”

Here ngmodel is a directive and username is the property.

Follow the below example to understand two way data binding.

Create an input field which updates the property (‘username’) via two way binding.Output the username via string interpolation (in a paragraph below the input). A reset button gets enabled only when the username is empty and on clicking the username field is reset.

Take your career to new heights of success with Angular Training

Pre-requisites

Development Environment Setup- Visual Studio Code editor, Angular CLI, Node js.

Forms module is required for two way data binding- Import forms module from @angular/forms in the app.module.ts file. Adding FormsModule to the imports[] in the AppModule.
Step 1

Create a new Angular app by running the following command from the terminal – ng new DataBindingExample

Step 2

Go to the AppModule.ts file and import Forms module from ‘@angular/forms’ and add FormsModule in imports[].

import { BrowserModule } from '@angular/platform-browser';    
import { NgModule } from '@angular/core';    
import { FormsModule } from '@angular/forms';    
import { AppComponent } from './app.component';    
import { UsernameComponent } from './username/username.component';    
    
@NgModule({    
  declarations: [    
    AppComponent,    
    UsernameComponent    
  ],    
  imports: [BrowserModule, FormsModule],    
  providers: [],    
  bootstrap: [AppComponent]    
})    
export class AppModule { } 

Step 3

Create a component by running the following command in the terminal – ng g c userComponent

Step 4

Once the component is created, go to the userComponent.ts file and create a property called username as shown in the below code.

import { Component, OnInit } from '@angular/core';    
    
@Component({    
  selector: 'app-username',    
  templateUrl: './username.component.html',    
  styleUrls: ['./username.component.css']    
})    
export class UsernameComponent implements OnInit {    
  userName='';    
  constructor() { }    
    
  ngOnInit(): void {    
  }    
    
  checkResetUsername(){    
   this.userName='';    
  }    
}    

Go to the username.component.html file and create a form which looks similar to below 

 User Name:   

Entered user name is,  

Reset User

<label>User Name</label>    
    
<input type="text"     
class="form-control"    
[(ngModel)]="userName">    
<p>Entered user name is:{{userName}}</p>    
    
<button class="btn btn-primary"     
style="background-color: darkblue;"     
[disabled]="userName===''"    
(click)="checkResetUsername()">Reset User</button>  

In the above code the [(ngmodel)]=”userName” is the one that represents two way data binding.  

Step 5 

Finally add the reference to our newly created component in the app.component.html file

<div class="container">    
  <div class="row">    
    <div class="xs-col-12">    
    <p>create a input field which updates the property ('username') via two way binding.Output the username via string interpolation(in a paragraph below the input), A reset button that gets enabled only when the username is empty and on clicking the username field is reset to empty string</p>    
  </div>    
</div>    
  <div class="row">    
    <app-username></app-username>    
  </div>    
</div>

Results

 When username is entered in input field, the same value is displayed in the below line; i.e the entered value gets echoed which is two way data binding. Reset button works as expected.

Read More Info Regarding Angular Online Training

How To Use jQuery Datatable In Angular

Introduction

In this article, I am going to explain how to use and integrate the jQuery datatable with AngularJS. DataTable is a prebuild functionality and a plug-in for the jQuery JavaScript library. It is a highly flexible tool based upon the foundations of progressive enhancement. It adds advanced interaction controls to any HTML table.

Overview of the process

  • Create a web page to display the data.
  • Get data from a SharePoint list.
  • Reference jQuery datatable in the header of HTML file.
  • Integrate the jQuery datatable with AngularJS.

To get in-Depth knowledge on Angularjs you can enroll for a live demo on Angularjs Online Training

Step1

Create a web page with a Table view to display the data which we get from the script code.

Angular

HTML

Here is the HTML code for the look and feel of the above webpage. We must need the table view to integrate the jQuery datatable.

<table width="100%" cellspacing="0" border="1">  
    <thead id="TblHead">  
        <tr>  
            <td>View</td>  
            <td>Req No.</td>  
            <td>Vendor</td>  
            <td>Date Required </td>  
            <td>Requisition Date</td>  
            <td>Approval Status</td>  
            <td>Order Status</td>  
            <td>Notify</td>  
        </tr>  
    </thead>  
    <tbody>  
        <tr ng-repeat="MyOrder in MyOrders">  
            <td><a title='Click to view' href="#" target='_blank' class='btn btn-info btn-md'><span class='glyphicon glyphicon-user'></span> View</a></td>  
            <td> {{MyOrder.OrderFrom}}</td>  
            <td>{{MyOrder.Vendor}}</td>  
            <td>{{MyOrder.DateRequired | date}}</td>  
            <td>{{MyOrder.RequisitionDate | date}}</td>  
            <td>{{MyOrder.WorkStatus}}</td>  
            <td>{{MyOrder.OrderStatus}}</td>  
            <td>Notify</td>  
        </tr>  
    </tbody>  
</table>  

Where all the <tr> tags will repeat as per the data in the list using the ng-repeat directive of AngularJS.

Step 2

Get all the data from the SharePoint list on page load. This is the script code for retrieving the data from a SharePoint list using Angular with REST call.

$http({  
    method: 'GET',  
    url: _spPageContextInfo.webAbsoluteUrl + "/_api/web/lists/GetByTitle('RequisitionOrders')/Items",  
    headers: {  
        "Accept": "application/json;odata=verbose"  
    }  
}).success(function(data, status, headers, config) {  
    Console.log(data.d.results);  
}).error(function(data, status, headers, config) {});  

Step 3

Integrate the jQuery Datatable with AngularJS as below.

Take your career to new heights of success with Angular Training

In HTML file

Type the below line in your HTML file. The ID in HTML will help to bind the datatable functionalities to the entire table.

<table width="100%" cellspacing="0" id="user_table" class="users list dtable" border="1">  

In Script

Store the retrieved data to a scope.

$scope.MyOrders = data.d.results;  

Then, the defined scope variable named $scope.MyOrders will be used as settings for the data tables.

Integrate the Datatable to the AngularJS by adding the following code in success.

angular.element(document).ready(function() {  
    dTable = $('#user_table')  
    dTable.DataTable();  
});  

References

Please add the following JS & CSS files to your code in the following order.

<link rel="stylesheet" href="https://maxcdn.bootstrapcdn.com/bootstrap/3.3.6/css/bootstrap.min.css" />  
<link rel="stylesheet" href="https://cdn.datatables.net/1.10.12/css/dataTables.bootstrap.min.css" />  
<script src="https://code.jquery.com/jquery-3.1.1.min.js"></script>  
<script src="https://cdn.datatables.net/1.10.12/js/jquery.dataTables.min.js"></script>  
<script src="https://cdn.datatables.net/1.10.12/js/dataTables.bootstrap.min.js"></script>  
<script src="https://code.angularjs.org/1.3.0/angular.js"></script>  

Let’s see the result on screen as below.

Angular

Hence, we have integrated the jQuery datatable to an Angular application successfully. Now, all the functionalities will work with the AngularJS application just same as they work in a jQuery application.

Conclusion

In modern web applications, most of us are likely to develop single page applications. To do so, we use AngularJS. Usually, table manipulation in AngularJS is easier than in normal jQuery. But still, search and server-side pagination are not straight forward in AngularJS. Hence, we can use datatable in AngularJS too.

Features Of Angular


MVC Architecture

The main imperative component is the MVC or Model-View-Controller engineering. The thought behind utilizing this outline design (engineering), from my perspective, is to divide the web application into a more reasonable structure. The MVC engineering involves three imperative components, the Model, View, and Controller.

Model

The model is the place your information is stored. Either the information we are discussing can be a static information or powerfully got from an information source, tucked in a server that is miles far from the customer, utilizing JSON.

A model includes a straightforward JavaScript question called the degree. Attached to a controller, the model question gets the information (from the source) and conveys it to a view (HTML).

myApp.controller(    
'myController',    
['$scope', function ($greet) {    
   $greet.greetings = function () {    
   $greet.theguest = 'Hello ' + $greet.name;    
   }    
   } ]    
);    

In the above content, the $scope is a protest in the model. Perceive how it is epitomized inside the controller() technique.

To get in-Depth knowledge on Angularjs you can enroll for a live demo on Angular Online Training

View

In Angular, the view contains HTML components and orders. This is the area of use, which is unmistakable to clients (utilizing a program). Other than markups, each view has as an articulation (with wavy props), which is fixing things up to the extension protest.

<div ng-app="myApp" ng-controller="myController">  
  
<p>Enter your name <input type="text" ng-model="name"/></p>  
  
<p><input type="button" value="Click Me" ng-click="greetings()"/></p>  
  
<p> {{ theguest }} </p>  
  
</div>  

The above bit of markup, otherwise called Template in Angular, when bound, is then called the view.

Controller

The controller really controls the whole business rationale of your application. The underlying stage is set here, that is, it introduces and enrolls the application by making another Angular Module.

Tap the beneath demo connect to see the model, see, the controller that we examined above in a solitary page.

Take your career to new heights of success with Angular Training

Two-Way Data Binding

Data-Binding makes a connection amongst model and view.

The two-way Data Binding is an uncommon element at any point coordinated in a JavaScript structure. In two-way information, any change made in the view will reflect in the demonstration, likewise changes made in the model will reflect in the view. It is a two-way process.In Angular, we have to utilize the ng-show mandate to make a two-way information authoritative. This mandate will tie the model to the view. We’ll do an example to comprehend the procedure better.

A Two-Way Data-Binding Example,

Let’s take the case of an offering procedure. I have set the default cost of an item as “75”. Be that as it may, we need our clients to enter their own particular cost for the item.

<div ng-app="">  
    <p> <label>Current Bid Value</label> <input type="text" ng-model="bid" ng-init="bid ='75'" /> </p>  
    <p> ${{bid}} </p>  
</div>  

In the above illustration, I have bound the model variable “offer” to an information box, likewise set a default esteem (75) utilizing ng-init mandate. This is one- route authoritative, since the information box and articulation (with wavy props) shows the model factors esteem. Sufficiently reasonable.

In any case, when the client inputs an alternate esteem, it changes the model variable. A two-way restricting scenario is happening in real life.

Are you Interested to learn Angular? Enroll now for a FREE demo on Angularjs Online Course

Templates

In Angular, a layout typically implies a view with HTML components connected to Angular Directives, including markup for information restricting utilizing articulations (with wavy supports). We will examine the orders and articulations later in this article.

Layout case

<div ng-app="app1"> <input type="text" ng-model="expamt" />  
    <p> ${{expamt}} </p>  
</div>  

An Angular layout looks essentially like a markup, aside from its qualities. To make it dynamic, be that as it may we have to include a controller and a model.
Recorded underneath are the components and properties, which make up the layout.

  • Directive – In the above illustration, the ng-application and ng-demonstrate are orders.
  • Markup – Binding the view with a model utilizing the wavy props {{ offer }} (articulations) is the markup.
  • Filters – Filters are helpful for organizing the incentive in an articulation. It is extremely helpful. I have clarified about channels later in this article.
  • Form Controls – We can utilize Angular Form Controls to approve client inputs. It gives us a chance to expect the shape has an information field, which acknowledges email ids, as it were. The shape control will approve the information and show a message if the esteem is invalid.

Directives

Directives are qualities connected in the View. Joined to HTML components, the mandates enlarge the components with new practices. Did you see the above illustrations, every component has orders, prefixed with ng-. At whatever point, we connect an order with a component, it discloses to AngularJS that it is a piece of Angular application and Angular treats it that way.

I suggest you read my first article about AngularJS where I have clarified about different orders in detail with cases. Here in this illustration, I have utilized another valuable mandate, called the ng-incorporate, to include the substance of a .htm record.

<!DOCTYPE html>  
<html>  
  
<head>  
    <script src="https://ajax.googleapis.com/ajax/libs/angularjs/1.3.8/angular.min.js"></script>  
</head>  
  
<body>  
    <div ng-app>  
        <div ng-include="'hello-child.htm'"></div>  
    </div>  
</body>  
  
</html>  

It has two directives. The first is the ng-application to instate the application. This will inform Angular regarding the application and its highlights. Next is the ng-incorporate order, which is valuable for showing information extricated from an outer record.

Expressions An Angular expression displays the result exactly where it is located or assigned. Let us see an example.

Syntax

{{ expression }}

<!DOCTYPE html>  
<html>  
  
<head>  
    <script src="https://ajax.googleapis.com/ajax/libs/angularjs/1.3.8/angular.min.js"></script>  
</head>  
  
<body>  
    <div ng-app> Hello <b> {{ 'Angular expression' }} </b> </div>  
</body>  
  
</html>  

Result::: Hello Angular expression

This is one of the least complex cases of an Angular articulation. Perceive how I have appointed the name inside the wavy supports. I am utilizing a string incentive as an articulation, and it shows the yield there itself, between the HTML striking tag.

String Expressions

Use a chance to take this String articulation case to the following level. You can appoint qualities to the articulations, powerfully utilizing an Angular order. This system will save you from allocating static esteems and rather you can include distinctive sorts of qualities as indicated by your decision.

Note

I won’t utilize the <html> and <head> labels over and over in my cases. Rather, I’ll include the articulations inside the <div> tag.

<div ng-application ng-init="name='Hello Hamid'">  
  
Emp Name is <b> {{ name }} </b>  
  
</div>  

The yield of this illustration is the same as above. But I have introduced the esteem utilizing ng-init mandate and later stretched out the variable name to the articulation.

Number Expressions

We can utilize numbers or numeric esteems in Angular articulations. Numeric esteems can have decimal esteems as well.

<div ng-app  
   I have rs <b> {{100}} </b> in my pocket.  
</div> 

Result

I have rs 100 in my pocket.

Moreover, you can utilize numbers in Angular articulations powerfully, utilizing orders. In the underneath case I have pronounced a variable utilizing ng-demonstrate mandate, and later showing the variable’s an incentive in the articulation. I have likewise included a channel “money” with the variable.

<div ng-app>  
   <span>  
      <label>Enter your expectation amount</label>  
      <input type="text" ng-model="expAmount" />  
   </span>  
<br/>  
   <p> <span> {{expAmount | currency}} </span></p>  
</div>  

One-time binding Expressions

With adaptation 1.3, Angular presented another component, called the One-time official, surprisingly. In the event that you utilize :: (no spaces) in an articulation, it will make one-time ties. What is the motivation behind this component? It is not exceptionally basic for a learner to comprehend this idea promptly. In any case, I’ll clarify it.

Like some other applications, an Angular application too may have numerous components, and we tie these components with information. The Angular $watch() API keeps a watch on every authoritative. It runs a circle through every one of the ties, searching for information changes. These circles can devour significant assets if at any stage a view includes numerous information ties.

When we announce an articulation utilizing::, it advises Angular to overlook the watch once an esteem is relegated to it. Thus, we can proclaim different articulations as one-time official, which will diminish the circles ($digest() cycles), and the last outcome is enhanced execution.

Give us initial a chance to make an ordinary official. Here in this application, I need my clients to enter the EmpolyeeId consistently and tap the submit catch.

<div ng-app>  
EmpId <input type="text" ng-model="EmpolyeeId" />  
<button ng-click="newId = EmpolyeeId" ng-init="EmpolyeeId">Submit</button>  
  
<p>Normal Binding: {{ newId}} </p>  
</div>  
  
<p>One-time Binding: {{:: newId}} </p>  

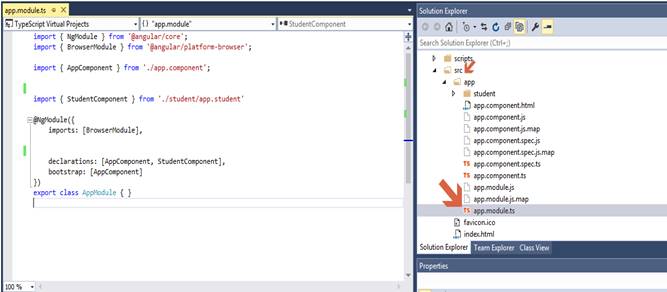
Modules In the start of this article, while clarifying about MVC, I have said how the engineering helps in outlining Angular applications by dividing the application into minimal reasonable structures. The Modules are the mainstay of this engineering. A module makes an all-around characterized structure, which will continue to get everything sorted out, in one place.

A solitary application may be more than one module. By making another module, every application is first introduced and enrolled.

<script>  
// FIRST APP.  
var mailApp = angular.module('app1', []);  
  
// SECOND APP.  
var bullionApp = angular.module('app2', []);  
</script>  

Scope 

A Scope is a JavaScript protest that sits inside the model and conveys information to the view. The view’s demeanor will get the value(s) from the $scope and show the outcome precisely where the articulation is found.

<div ng-app="app1" ng-controller="ctrl1">  
<p>name: {{ empName }} </p>  
</div>  
  
<script>  
var app1 = angular.module('app1', []);  
  
app1.controller(  
'ctrl1',  
   ['$scope', function ($name) {  
      $scope.empName = 'hamid';  
   } ]  
);  
</script>  

Filters

An Angular Filter adjusts the information before showing it to the client. We can utilize these channels with articulations and mandates. A channel is normally a predefined watchword, utilized with the image “|” (a pipe).

While clarifying about Template in this article (see the format segment above), I have utilized an articulation to show the offer sum.

<div ng-app="app1">  
<input type="text" ng-model="myamt" />  
  
<p> ${{myamt}} </p>  
</div>  

The articulation has content inside the wavy supports {{bid}} and is prefixed with the “$” (dollar) sign. The Angular Filter money would save me from utilizing the “$” sign. Basically include a “|” pipe after the content offer and include money.

<p> {{myamt | currency}} </p>  

Filters are case-delicate. In this manner, be cautious while including it in your application.

Some normally utilized ones are as follows,

  • currency
  • number
  • uppercase
  • lowercase
  • date
  • orderBy

Summary

I hope this article will help learners to comprehend the highlights, offered by the AngularJS structure.

Beginners Guide For Angular Module

Introduction

For better understanding, before directly jumping into the Angular module, let me provide a few lines about what is Angular and what are Angular application.

Angular

  • Angular is a framework to develop rich client-side applications for the web.
  • It is an open source JavaScript framework designed by Google.
  • Google changed the name from Angular.js to Angular because the structure of the application varies entirely.
  • Applications developed using Angular framework are referred to as Angular applications.

Angular Application

  • An Angular application is a collection of modules.
  • The execution of an Angular application starts from the module specified in the main.ts file.
  • .ts files are written in TypeScript language.
  • To get in-Depth knowledge on Angularjs you can enroll for a live demo on Angularjs Online Training

Example

import { platformBrowserDynamic } from '@angular/platform-browser-dynamic';  
import { AppModule } from './app/app.module';  
platformBrowserDynamic().bootstrapModule(AppModule);  

Angular Module

  1. In general, Module is a collection of business/domain functions designed to achieve a single purpose. All the functions within module must work together cohesively to achieve the objective which is defined for the module.
  2. In Angular, a module is defined in the TypeScript file which is having the decorator @NgModule.
  3. NgModule is a function that takes a single metadata object, whose properties such as declarations, export, import, bootstrap, and providers, describe the module.

Example

Pictorial representation of NgModule decoration –

Angular

In the above diagram, the @NgModule directive takes a single metadata object whose properties describe the module.

Take your career to new heights of success with Angular Online Training

  • declarations – the View classes that belong to this module. Mainly, Angular has three kinds of view classes: components, directives, and pipes.
  • imports- other modules whose exported classes are needed by component templates declared in this.
  • bootstrap- the main application View called the root component, that hosts all the other app Views. Only the root module should set this bootstrap property.
    Code Representation of NgModule Decoration

Code Representation of NgModule Decoration

import { NgModule } from '@angular/core';  
import { BrowserModule } from '@angular/platform-browser';  
import { AppComponent } from './app.component';  
//Newly created and referenced here  
import { StudentComponent } from './student/app.student'  
  
@NgModule({  
      
    //Here Add all  your Modules used in project  
    imports: [BrowserModule,HttpModule],  
  
    //Here Add all your component,directives and pipes used in project  
  
    declarations: [AppComponent, StudentComponent,directive1,directive,pipe1,pipe2,],  
  
    //Here the component to be bootstrapped or start  
    bootstrap: [AppComponent]  
})  
export class AppModule { }  

Code Explanation

  1. In Angular, we have some of the libraries such as ‘@angular/core’, ‘@angular/platform-browser’ and we can install them with the npm package manager.
  2. All the Angular libraries begin with @angular prefix.
  3. Many Angular libraries are modules (such as – FormsModule, HttpModule, and RouterModule.
  4. Modules can also add services to the application. Such services might be internally developed, such as the application logger. Services can come from outside sources, such as the Angular Router and Http client.
    Additional Note

We can also say that Metadata can be used for the following purposes.

  1. Declare which components, directives, and pipes belong to the module.
    Make some of those classes public so that the other component templates can use them.
  2. Import other modules with the components, directives, and pipes needed by the components in this module.
  3. Provide services at the application level that any application component can use.

Default LocationWhere app.module.ts is located in the project?

After installation of Angular, Module class will be under the project->src-> app.module.ts.  Here is SnagIt.

Angular

Conclusion

  • NgModule decorates the above class. Once it is decorated, then the normal class will become an NgModule class.
  • Every application should have at least one Module which is the root module that you bootstrap to launch the application.
  • And by default, the Angular app we will have an NgModule class called AppModule that is presented in the module.ts file.
  • You can call it anything you want. The conventional name in AppModule.
  • Read More Here Angular Certification

Why BizTalk Server For eCommerce Solutions?

eCommerce server is a web-software that accomplishes the main functions of an online shopping portal such as product display, online ordering, and inventory management etc. The software works in association with online payment systems to process all payments.

To begin with let’s understand BizTalk first. BizTalk is an industry initiative governed by Microsoft to promote Extensible Markup Language i.e. XML. It is the common data exchange language for e-commerce and application integration on the Internet.

BizTalk acknowledge that the development  of e-commerce requires businesses which are utilizing various  types of computer technologies to have modes to share the data. Favoring XML as a stage unbiased approach to speak to data transmitted between PCs, the BizTalk group has given some rules, referred to as the BizTalk Framework, for how to publish schema i.e. standard data structures in XML and how to use XML messages to integrate the software programs.

If you want to gain in-depth knowledge on Biztalk go through this link Biztalk training

Key features in BizTalk Server are:

Better support for deploying, monitoring, and managing e-commerce applications

Significantly simpler installation

Improved capabilities for Business Activity Monitoring (BAM)

Why to opt for BizTalk Server?

The answer is simple, it makes complex problems easier to solve. BizTalk Server integrates two key features i.e. orchestration and messaging. While the powerful messaging engine handles message transport and mapping, BizTalk Orchestration Services can orchestrate business processes consist of components, and messages that are sent and received using the BizTalk Messaging Service.

It enables:

Dynamic business process

Integrates business partners and its applications

Provides interoperability using the public standards

It uses XML internally to define the data and structure of your business documents, and it uses standard Internet protocols like HTTP and Simple Mail Transfer Protocol (SMTP) to deliver these documents to their destinations, enabling you to inter operate with various applications running in any environment as long as those applications support Internet standards.

Take your career to new heights of success with Biztalk Online Training

How it helps?

Problems faced by the organization generally:

Disparate applications: It’s too difficult to integrate dissimilar applications within the company.

Dissimilar reports: There is no way to generate integrated, timely reports from the various applications because the data is stored in so many places.

No set procedure: Company does not have any consistent method for implementing the critical business processes.

Programming overruns: It takes too long to develop integrated solutions for the company’s enterprise resource plan.

Modification difficulties: Once the internal applications are integrated, changing them is arduous and expensive.

Partnering headaches: It’s too difficult to integrate the company’s business processes with the trading partners.

Changing partners: If another business offers a better deal, it’s too difficult to take advantage of this with the entire IT infrastructure that is required.

However, business over the internet i.e. e-commerce are when integrated with these in-house applications can resolve these complex situations and reliability increases. BizTalk Server is designed to help you solve these problems. Using graphical tools like BizTalk Orchestration Designer and BizTalk Editor, BizTalk Server lets you design your unique business processes in a visual design environment. BizTalk Server then executes the visual diagram, providing rapid application development (RAD) for business processes.

BizTalk server simplifies the workload by producing simplified data which can be evaluated easily. To summarize the whole, BizTalk Server is a technology solution that improves efficiency and reinvents business ideas and strategies. It boosts the features of e-commerce independent of an operating system and programming language.

GET MORE INFO ON Biztalk Certification Training

AngularJs V/S Angular

Angular: Angular is the complete rewrite of Angularjs. It is written in typescript format rather than a java-script as in angularjs which makes it more flexible than Angularjs. It is built by the same team who wrote angularjs. Angular is a paradigm shift from angularjs. Still, both technologies are used by programmers and web developers.

Angularjs: Angularjs is an open-source java-script framework from Google for front-end development of applications. Being part of the java-script ecosystem it struck the web developers immediately. It leads to the development of single-page websites with a good user interface.

 According to stack overflow survey 2018, angular technology is the second most used technology in frameworks, libraries, and other technologies. 36.9% of developers surveyed accepted using angular and angularjs is to create splendid user interfaces. In the same survey, 46% believed that angular was one of the most dreaded frameworks. This difference in frameworks between the developer communities has started since the introduction of angular 2 in 2016.

For your better understanding let us go through the differences between angular and angularjs. If you are already a developer or you want a good application for your business, this debate will exhilarate you, so without any delay let us dive into the discussion.

To get in-Depth knowledge on Angularjs you can enroll for a live demo on Angular Online Training

 Architecture: The architecture of angularjs is supported by model view architecture you simply need to put your business logic into it and it will give the output you desire . The model pipelines are automatically generated by angularjs.

In the opposite the angular has built with components and directives. Components are nothing but directives with a already defined template. This makes it easy to develop your applications.

Typescript: Angularjs uses java-script whereas Angular 2 and the latest versions use typescript. Typescript is a superset of java-script and provides static typing during the development process. Static typing not just improves performance but avoids many pitfalls that are making angularjs difficult to use for larger and complex applications.

Dependency injection: Both angularjs and angular use dependency injections and how they use it is the difference between the two technologies. Angular js Di is injected into various controller functions and directive definitions.

Angular uses a hierarchical dependency injection system using declarations, construction functions, and providers.

Take your career to new heights of success with Angular Training

Command Line Interface: Angular 2 uses its command-line interface or CLI.it is used to generate components, services, etc. You can easily generate different versions of the same project on different platforms. AngularJs doesn’t have its own CLI.

Performance: Angularjs was developed for designers, not developers. Even though there are few developments in technology it doesn’t fulfil the need of the developers.

Angular has been upgraded and angular 2, angular 3 give good performance in speed and dependency injection.

Speed:

Angularjs provides features like 2-way binding for reducing development effort and time. However, page loading takes more time because of processing on the client-side.

Angular 2 provides a better structure to co-create and maintain big applications with a better change detection mechanism. Angular 4 is the fastest version till date to be released.

Mobile support: Angularjs don’t support mobile development whereas angular does support mobile development. This makes Angularjs prehistoric in this age of mobile-first generation.

Get More Info On Angularjs Online Training

Advantages and Disadvantages of Angularjs and angular:

Both angular and angularjs have their advantages and disadvantages. Here I took the liberty of listing a few of them for you to understand better between technologies.

Advantages of angularjs:

  • It is easier to learn because it is written in java-script
  • The two-way data binding facilities make it easier for data binding without the intervention of developers.
  • The development takes less time in angularjs, because of its faster coding and prototyping support.
  • The architecture of angularjs helps in separating data from design, which makes it easier to develop and maintain complex applications.
  • It is highly reusable because of simple and organized coding.

Disadvantages of angularjs:

  • If the system disabled java-script then the application will not run on it.
  • The developers must be familiar with MVS architecture to develop in angularjs.

Advantages of angular:

  • Typescripts allow code optimization using the OOPs concept.
  • It is a mobile-oriented
  • Has improved dependency injection and modularity
  • It offers simple routing.

Disadvantages of angular:

  • It is more complicated to learn as it is in typescript and you need to master typescript to use it.
  • It is inefficient to create small and simple apps.
  • The command-line interface is much loved by developers but they still feel it’s incomplete.

Angular or Angularjs:

If you look at a long list of advantages of angular and angularjs, you might have come to a conclusion of angular over angularjs but you must also keep in mind the steep learning curve of learning in angular. If you are looking to develop a simple application with no complexity go for angularjs but you need to develop your application with more scalability and complexity you must go for angular.

The final take:

Angularjs is still useful or else everybody might have shifted to angular 2 or angular 4. Every angular version has its significance and its different uses. If you are already using a previous angular version it must not be difficult for you to make a switch into a newer upgraded version similarly with angularjs. By pledging long term support for angular Google has further positioned it for long term scalable resource-intensified projects 

ServiceNow Asset Management: Relevant to ServiceNow Admin

ServiceNow Asset Management helps to automate the IT asset life cycles with intuitive and attractive workflows. Servicenow Admin looks after the Asset management that integrates the physical, technological, and financial aspects of IT assets. Moreover, IT asset management is any information, system, or hardware that is useful in the course of major business activities. 

Most IT services run on IT assets. This is an asset base that poses various challenges and opportunities from management, cost, and risk areas to reduce risk and minimize cost, entities need to know the hardware assets they use. Moreover, the location of those assets, usefulness, and how they are used, cost, and the value they deliver are the aspects are important to know. The ITAM tracks financial information and resources, while the CMDB tracks CI details and relationships among them.

Let us discuss Asset Management within the interest of ServiceNow Admin. Moreover, there are many things to know within ServiceNow Asset management.

To get in-Depth knowledge on Servicenow admin you can enroll for a live demo on Servicenow admin online training

Role of ServiceNow admin towards ServiceNow asset management

The ServiceNow admin is capable of tracking all aspects including the finances, contract management, inventory, and complete asset information. Besides, the platform helps to record all actions and transactions. It also helps to gain full control and audit capacities from initiation to retirement.  The role of ServiceNow admin becomes crucial in this regard. 

Control

To optimize asset investment and provide extreme services relating to various aspects. the admin has to follow relevant regulations in this regard. Besides, the admin also controls the activities within the system by applying various ideas. 

Efficiency to Savings

The admin should involve in the automation of lifecycle processes to save on manpower investment. He also looks into minimizing waste resources and avoids repetitive tasks. Moreover, this will help to make savings for the business and growth in the market. 

Process Control Mitigates Risk

The professional is responsible to lead employees and customers with process flow management. It ensures internal and external compliance management.

Single Source of Information

The ServiceNow admin maintains all the data in one secure application that is Asset management. It removes irrelevant systems & processes. Moreover, it combines asset management and configures information by linking with the ServiceNow CMDB. 

Seamless Asset Provisioning

Asset Management makes it easy to create a purchase order using a few clicks. These assets are tracked and they are automatically created within the system. Moreover, the asset records are created cleanly with complete data. This data related to the asset model, request, order, cost, etc. And the provisioning of these assets carried on without any delay.

Take your career to new heights of success with Servicenow admin training

HR Asset On-boarding

Asset management provides the capability to source, configure, and implement hardware and software. While HR Onboarding Case functions it includes the following;

  • Standard items selection like computers, mobile devices, software, monitors, printers, etc.
  • Sourcing assets from the stock held
  • Purchasing and collecting assets those not available in stock
  • Deployment of assets requested within the time frame. 

The ServiceNow Asset Management tracks the key T&Cs of contracts and makes them easy to search. Furthermore, it includes management for version control and storage of electronic documents securely. 

ServiceNow Asset Management implementation

Many processes are involved in ServiceNow projects. These processes help the project or any other work to carry on smoothly. Moreover, ServiceNow asset management includes the following process of implementation. 

Configuration Management

This management works with the technical team of Asset Management. Moreover, it covers the maintenance stage of the asset life cycle at every moment. Therefore, the user or ServiceNow admin should use it for tasks related to asset management. Such as incidents, issues, or changes related to a particular asset. These tasks make the function easier to perform and get the result.

Request Management:

This is useful to enable the users to browse Service Catalog and order new assets by filling forms. Moreover, handling request workflows are also included in ServiceNow Asset Management. These are concerning ServiceNow Admin to process them properly. There are many requests come through in daily sessions but they are to be handled smartly. 

Get More Info On servicenow administrator training

Procurement 

As the users request an asset that is not in the disposal this module comes in action to create purchase orders. Moreover, it looks after the entire purchase life cycle from start to receipt. This module helps as an alternative to Asset Management by covering the purchase stage of the asset life cycle. All the process is done in the presence of ServiceNow Admin. These help him to get better ideas. 

Servicenow Asset Management use cases

There are so many uses of ServiceNow Asset Management with relevance to ServiceNow admin within the interest of any business unit. A few of these uses or benefits have been discussed below.

  • Using ServiceNow Asset management, the ServiceNow Admin helps to control purchased inventory and its usage while cutting the costs.
  • It helps to manage the whole asset life cycle from planning to disposal of the various company assets.
  • This is used to regulate along with relevant processes, standards, and regulations of the company.  It helps to take action on regulations and cost valuations for the list of publishers.
  • ServiceNow Asset Management helps to review licenses and optimize positions for the most complex products. The system is useful to improve time-value by automating the process of importing data. This is useful to buy it with proper validations. 
  • It is used to assess the exposure and impact of the various software issues. Besides, it helps to reduce software expenses by identifying shadow IT and capacities.
  • Moreover, the SNow admin helps to improve the end-user experience with faster purchase and deployment of assets. This is done within the company’s standards.
  • Get the business results in a fast manner. Moreover, it explores software data workflow to be fast to deliver value to the assets using various platforms.
  • It helps to provide better knowledge and control over the assets that enable them to make better decisions. 
  • Determine the asset costs in their actual lifecycles as a whole. 
  • This helps to simplify audit preparations and makes change management very strong. 
  • The Asset Management automates the process and tracks the details of hardware and devices. 
  • Moreover, using asset management, payment of contract information is also tracked. It includes the ability to generate expense ideas on a proper schedule. 
  • Contract management also includes reports, dashboards, and notifications, etc. It ensures that all parties are fully aware of pending expirations, or subscriptions.

ServiceNow Asset Management roles

The ServiceNow Asset Management (AM) roles and responsibilities are of many types. These include; SAM admin, sam user, sam contract manger, model manager, etc. This role has full access to the Asset  Management application. This role requires importing assets, managing and reconciliation rules, etc.

Moreover, they are creating custom products and general rules, etc. Generally, the role of ServiceNow admin is responsible for general support, admin, etc. Moreover, he looks into the maintenance of the ServiceNow platform and its applications. The admin has to look after the system development and the automation process also. The above roles also relate to the (SN) Servicenow admin. He is the person who authors all the activities within the ServiceNow Asset Management. 

Focusing on Asset management, ServiceNow Admin has to refer to some complex activities of it. Besides, Assets can be of different types within a company.  But ServiceNow covers the number of assets available in its base system. 

ServiceNow Asset Management lifecycle

The lifecycle of ServiceNow asset management controls all the associated financial aspects of each asset from purchase to disposal. These criteria include:

  • Acquisition
  • Lease Cost
  • User Support
  • Manage Contract
  • Labor charges
  • Forecast budgets
  • Optimize lifecycle
  • Decision making

The above criteria are useful to define the admin’s role within Service Now. Moreover, by using the SN Service Catalog, ServiceNow admin can perform the following tasks:

  • He can able to set and enforce various rules and policies
  • Manages service and instrument contracts
  • Auto validates requests and processes
  • Audit program of various activities and services
  • Control risks and identifies unethical use
  • Moreover, it is also useful to optimize lifecycle investment to provide better IT services to the world. 

Moreover, the users can receive multiple assets for a purchase order in a single process on the mobile application. They are also able to request assets, view assets, and report incidents using a mobile device easily. 

ServiceNow Asset Management pricing

ServiceNow offers its customers and clients a fairly simple 15-day free trial. This is because most of the competitors offer 30 days. Moreover, the Express version is useful to those who are starting. And this version costs $10,200 per license p.a.

The Enterprise version allows more tracking across the business. Moreover, it had more features than the Express version. The pricing for the Enterprise version was started at $42,000 per year. Further, the price for asset discovery in both versions was $0.20 per node per month. Today ServiceNow is offering limited flexible plans to their customers. This includes a costing of license starting from $10,000 p.a. 

Thus, the above article explains the ServiceNow asset management concerning the ServiceNow Admin. It gives an idea of the working management and asset lifecycle of the whole process. Besides, the admin is the person who controls the whole process within the ServiceNow and its asset management. Not only asset management, but it provides various other products and services also. Using these various services, many business clients and users get satisfied. Furthermore, it’s a complete package of various activities that manage and control from start to end. 

Get more practical insights on ServiceNow and its varied products and services through ServiceNow Online Training from the industry best. IT Guru is the platform in this regard to get concise and latest skills to plan for a better future. 

Angular App Optimization Tips for Frontend Developers

How to optimize an Angular app? First, we need to consider how we understand optimization as such. Optimization helps achieve better app performance and easier code maintenance. Optimization is not a checklist or a to-do-list, and there is no universal way to optimize your app.


Optimization is a process, and it should start at the same time as the app development. It’s really hard to optimize the application that already exists (though it’s still possible of course), so we should take care of it during the whole project.


Here’s a list of the best tips to help keep your code in line with good practices and make your Angular application faster. Enjoy and optimize!

To get in-Depth knowledge on Angularjs you can enroll for a live demo on Angular Online Training

1. Code minification

Trivial, but really important – each part of the application should be minified before deploying to the production stage. If you have ever used Webpack, you probably know plugins such as UglifyJS, MinifyCSS, etc. They remove every whitespace and every function that is never executed. Moreover, they change functions’ and variables’ names to shorter ones that make the code almost unreadable, but the size of the compiled bundle is smaller.

Fortunately, with Angular, we don’t have to remember to add Webpack scripts to minify the code. All we have to do is make a bundle using ng build –prod command. It’s just good to know when and how it happens.

OnPush Change Detection

Each Angular component has its own Change Detector that is responsible for detecting when the component data has been changed, and automatically re-render the view to reflect the changes. Change Detector is called whenever DOM emits an event (button click, form submit, mouseover etc.), an HTTP request is executed, or there’s an asynchronous interaction such as setTimeout or setInterval. On every single event, the Change Detector will be triggered in the whole application tree (from the top to the bottom, starting with the root component).

The numbers show the order of checking the changes by the Change Detectors after the event in the Component in the left bottom corner. To change Detection Strategy for the component, the changeDetection in Component declaration should be set to ChangeDetectionStrategy.OnPush as below:

@Component({
   ...
   changeDetection: ChangeDetectionStrategy.OnPush
})

After that, the Change Detectors will work by comparing references to the inputs of the component. Inputs in this component are immutable and if values in these inputs have not changed, change detection skips the whole subtree of Change Detectors, as depicted below:

Take your career to new heights of success with Angular Training

Change detector for a component with OnPush Strategy will be triggered only when a value in @Input() has been changed, an event has been emitted by a template, an event has been triggered by Observable in this component or this.changeDetector.markForCheck() has been called.

Pure pipes instead of functions/getters in templates

class foo {
   private _bar: boolean = false;
   get bar(): boolean {
      return this._bar;
   }
}

get used in the view is nothing more than a function call. A better idea is to use pure pipes which will always return the same output, no matter how many times they will receive the same input. If the Change Detector reaches this view and pure in the pipe is set to true (default), the Change Detector will not check if that value has been changed because it knows that it will return exactly the same value.

 Async pipe

<div>Time: {{ time | async }}</div>

The async pipe allows subscribing to Observable directly from the template.With async pipe, there’s no need to bother about unsubscribing. What’s more, Change Detector will check if the value was changed only when Observable had changed itself.

5. Unsubscribing

When using RxJS, it’s really important not to forget about unsubscribing, otherwise there’s a risk to get memory leaks in our application. There are a few methods to unsubscribe a Subscription, but choosing the best one is probably a subject for another blog post – for now, just remember to do it. Here are the methods →1st method:

let sub1: Subscription;
let sub2: Subscription;

ngOnInit() {
   this.sub1 = this.service.Subject1.subscribe(() => {});
   this.sub2 = this.service.Subject2.subscribe(() => {});
}

ngOnDestroy() {
   if (this.sub1) {
      this.sub1.unsubscribe();
   }
   if (this.sub2) {
      this.sub2.unsubscribe();
   }
}

2nd method:

let subs: Subscription[] = [];

ngOnInit() {
   this.subs.push(this.service.Subject1.subscribe(() => {}));
   this.subs.push(this.service.Subject2.subscribe(() => {}));
}

ngOnDestroy() {
   subs.forEach(sub => sub.unsubscribe());
}

3rd method:

private subscriptions = new Subscription();

ngOnInit() {
   this.subscriptions.add(this.service.Subject1.subscribe(() => {}));
   this.subscriptions.add(this.service.Subject2.subscribe(() => {}));
}

ngOnDestroy() {
   this.subscriptions.unsubscribe();
}

4th method:

ngUnsubscribe = new Subject();

ngOnInit() {
   this.service.Subject1.pipe(takeUntil(this.ngUnsubscribe))
      .subscribe(() => {});
   this.service.Subject2.pipe(takeUntil(this.ngUnsubscribe))
      .subscribe(() => {});
}

ngOnDestroy() {
   this.ngUnsubscribe.next();
   this.ngUnsubscribe.complete();
}

Get More Info On Angularjs Online Training

Future Scope of DevOps – 9 Reasons To Learn DevOps in 2020

DevOps has a great and promising future. The practical applications of DevOps is increasing day by day. Let’s discuss the future of DevOps in different areas of the IT industry and where most opportunities lie. The demand for the DevOps is well reflected in the salary of DevOps Engineer in India.

The Trends and Future of DevOps

  1. DevOps in the Security Field
    The field of security is peculiar because the more you automate, the higher chances of automating problems too. So all automation being done in this area to be intrinsically controlled, and this brings enormous scope for DevOps philosophy.

Implementation of DevOps should ensure the security of the product being developed in production and even int the test environments. This stands as the governance and codes of ethics of DevOps philosophy. DevOps must ensure security protocols that ensure the application’s integrity and conformance with the security policies of the company.

To get in-Depth knowledge on DevOps you can enroll for a live demo on DevOps Online Training

  1. AI/ML in the DevOps Framework
    The software development life cycle is revolutionized with the DevOps methodology, cloud-native approach, and microservices architecture. DevOps integrates testing and production environments, and developers get to see the problems before applications go live.

Applying AI and ML to the DevOps pipelines can help you run builds and automation in a much better with closer insights a control. People are moving from DevOps to DataOps and AIOps, which focus on the use of artificial intelligence and machine learning to learn from logs and monitoring metrics to drive DevOps in a controlled fashion.

Tools like Moogsoft and Bigpanda are market pioneers in AIOps that collect data from different monitoring and logging systems, apply artificial intelligence to it, and provide the engineer with more detailed insights and actionable data. Read more about DevOps tools. DevOps is maturing with AI making like simpler for developers, operations guys, and the DevOps engineers.

  1. Automation for Every Company
    In today’s world, everything happens over the internet. Most companies are changing to be like an IT company that provides some particular services. For example, booking.com was a travel company which now functions as an IT company that provides travel services.

For every company, their software is the critical element that brings in sales and business. Hence automation of software deployment and infrastructure provisioning key to all modern businesses. It plays a crucial role in improving efficiency and brings out the best software. DevOps methodologies thus play a significant role in all modern companies today.

Take your career to new heights of success with DevOps Training

  1. Container Technology
    Container technology is evolving and emerging faster than before. Containers can be used in various ways to provide different benefits. Containers can be used to sandbox applications for security and resource constraints. Research is going around using containers per user or user session.

This idea brings a limitless array of opportunities for improving user security, system security, and performing user analytics. As containerization technology improves, containers will become more cost-effective to deploy.

  1. Platform as a Service (PaaS)
    Platform as a service (PaaS) is a growing field with a lot of applications for DevOps concepts. Gone are those days when people worried about building an entire infrastructure for the application. Today people only ask for the platform on which their applications can be hosted.

DevOps has a lot of applications in providing PaaS solutions in terms of configurations management, continuous security, and containerization. Whose knows, in the coming days, the technology might very well improve that developers would only need to define a couple of markers or entry points in their application, and this alone would be sufficient for the application to be hosted or deployed by itself.

Get more information from devops online course

  1. DevOps and Focus on Integration Between Edge Services
    The traditional model of on-premises is clearly changing. In the last few years, companies have moved to Infrastructure as a service (IaaS), Database as a Service (DBaaS), and Platform as a Service (Paas) solution. With cloud technologies pitching in heavily and containerization technologies going widespread, DevOps has to play a significant role in the integration of all these services that are hosted on different platforms.

Public clouds are gaining popularity and acceptance, and today, even the traditional companies are moving to cloud-based solutions because of the cost savings that they can offer. Companies are now planning to use configuration management tools along with container technologies to fully automate the infrastructure provisioning and management. This calls for a bright future for DevOps.

  1. DevOps Will Play a Role in Seamless Security Integration
    Most of the security breaches result from the vulnerability at the application layer. Companies are now trying to adopt a mature and secure software development approach that helps to evade all these threats. Companies are currently moving towards a programmatic approach to application security that embeds security in the early stages of the software development lifecycle.

Companies want a security approach that goes beyond just scanning and fixing security flaws. DevOps can play a vital role here. With the continuous security philosophy, DevOps can enable seamless security integration to allow the development teams to develop secure software code faster than before. DevOps continuous security ensures testings are done along the development lifecycle and not at the end of it.

Thus developers will be able to find code bugs during the development phase itself, ensuring the security of the software before the formal test phase.

  1. Job as a Code
    The development-to-operations handshake is still a manual and tedious process. In 2019, it is expected that DevOps philosophy would emphasize on “jobs-as-code” in the software delivery lifecycle. This could act as a coding automation instrumentation. This approach with the Infrastructure as a Code methodology and CI/CD pipelines will help reduce the time gap for the development-to-operations handshake.
  2. Containers Will Override Configuration Management
    In 2019, the world of DevOps is being shaken by container orchestration platforms. Container orchestration mechanisms are so powerful that they can grow to replace configuration management tools like Ansible, Chef, and Puppet.

Kubernetes is today the best known and most widely used container orchestration system, but many more are yet to hit the industry. If appropriately implemented, container orchestration systems can simplify the infrastructure provisioning and many of the complexities around it.

The DevOps world will have to adopt this new method of Infrastructure as Code. The industry will also move towards standardizing the frameworks for software versions minimizing the need for software configurations. For example, companies can release different docker images of the same software with different configurations as per customer needs. Thus the need for configuration management tools will get reduced.

Conclusion
The future of DevOps is very promising, and many more companies are set to accept this methodology. DevOps methodologies are itself changing with new tools and technologies coming in. We hope, in this article, we have discussed ideas around DevOps future scope and how it is going to revolutionize the industry further.

Explain about MicroStrategy?

MicroStrategy:

MicroStrategy is one of the BI application software. It supports a collective dashboard, highly detailed reports, ad-hoc queries, as well as Microsoft Office integration. It also supports mobile BI. With the help of this, we can connect with any data such as big data, flat files, social media data, etc. It offers a spontaneous way to create and modify BI reports.

To get in-Depth knowledge on MicroStrategy you can enroll for a live demo on Microstrategy Training

 MicroStrategy uses:

  • This can connect with existing enterprise apps and systems.
  • It is a useful tool for solving big data-related problems. 
  • This provides features for mobile analytics. 
  • It allows us to directly access a database with in-memory.
  • It can provide advanced and predictive analytics items.

The architecture of Microstrategy:

     This  Architecture  build with a three-tier structure. The following diagram shows the MicroStrategy Architecture. 

The First-tier consists of two databases. They are

Data warehouse:

It can contain the users analyzing information. That information is generally stored at the data warehouse using an extraction, transformation, and loading(ETL) process. The online transaction processing(OLTP) is the main source of the ETL process to get original data.  The different number of data warehouses can contain one metadata project. And one project can have more than one data warehouses. 

Get More Info On Microstrategy Courses

Metadata:

This provides information about your Microstrategy projects. Metadata is like an index to the information. It stores in your data warehouse. The microstrategy system uses metadata to know information about the data warehouse. And also it stores different types of objects to access the information. The metadata contains a database, metadata repository i.e used to separate your data warehouse.

The second tier consists of Microstrategy Intelligence Server. This is the main part of the Microstrategy system. This server always must run to provide the users to get information from the data warehouse. With the help of  MicroStrategy Web or Developer, we can easily get the information from the server. It generates reports. Those are stored in metadata across a data warehouse. And also it passes the results of reports to the users.

Finally, the third-tier consists of Web or mobile Server. It delivers the reports to a client. The Microstrategy Web client, Library Client, Desktop Client provides documents and reports to the users.

Various objects in MicroStrategy:

Microstrategy provides different types of objects that appear in the system layer. Most of the reports have specific business objects. Those objects are used to get collective data from the data sources.  

 The below diagram shows the various objects.

Administration objects:

   The Administration objects include things such as users, database instances, database login IDs as well as schedules. If we login to Microstrategy developer as an admin, then we will get an administration option at the secure enterprise. After opening this option we see various objects. It looks as below diagram.

The Administration objects have four sections. They are

System Administration

It provides various objects and also allocates clusters to the projects.

System Monitor:

This helps in identifying the status of the Microstrategy environment. It contains the below options.

  •  Jobs control the currently executing jobs.
  •  User Connections Monitor the number of user connections at a given time
  • Cashes controls the number of cashes and their sizes.

User Manager:

These are used by the admins to manage the Microstrategy users, It is used to handle the following user configurations. Those are

  •  User authentication uses to allow the user into the environment.
  •  User groups allow a number of users to assign a specific privilege.
  •  Privilege is used to provide features that are available in the environment.
  •  User permissions are used to allow or disallow the use of a specific object.

Schema objects:

Schema Objects are the logical view of the structure of the data warehouse. These objects are using during the creation of the Microstrategy project. If you want to see the schema objects, then login to Microstrategy developer as administrator. Then first click on the Schema object option. The following screen shows the various schema objects.

The Schema objects contain the following things.

  • Facts are the numeric values. They can be used to represent the value of some business data.
  • Attributes represent the granularity of data in the facts table. They show detailed data to the business.
  • Hierarchies represent the relationship between various values. They help in bring out drill-up and drill-down analysis on the data.
  • Functions and operators provide various mathematical functions and operators in Microstrategy to apply calculations to the data.
  • The table represents data in tabular form.
  • Transformations are provided data transformation features that are used for time-series based analysis of the data.

Report object:

These objects are build from application objects which are used for the business scenario. These objects provide the set of data for the user reports. As well as shows the relationship between the different data elements. To get the report object, first open the report and click on the report object icon as shown below diagram.

 In this example, we have three reports attributes. They are

  • The Category attribute showing the category of the products sold.
  • Region attribute shows the region of the products sold
  • The year attribute contains two matrices objects such as profit and revenue.

Features of MicroStrategy:

The following are the MicroStrategy features:

  • We can use it easily as well as provides self-service.
  • It offers the highest user capability.
  • It contains a plug and plays components.
  • This contains the highest report scalability as well as the highest data scalability.
  • With the help of this, we can format grid reports using a range of built-in styles.
  • It allows us to convert tabular reports in the form of graphs as well as charts.
  • This allows us to export in MS-Excel, HTML or text formats.

 In this article, I have explained about micro strategy and its architecture as well as its objects. I hope this article gives information about the need for MicroStrategy nowadays. Excel your career through Microstrategy online training.

Design a site like this with WordPress.com
Get started